Drawing Basic Fashion Figures

Have you created tons of faces? Are you ready to create the body? What about playing with the fashion figures?
The last lesson was super intense, I know, and I’m afraid today’s lesson is going to be intense too.
Today we’re going to see how to create a basic fashion figure, and how to create a dynamic pose. So, whether your source of inspiration has a basic or an action pose, after this lesson you’ll be able to tackle both.
You can complement this lesson with your workbook from page 28. Both of the videos I share here are from Fashion Drawing Basics, and remember to print out your Fashion Figure Cheat-Sheets from pages 41 or 42.
Now let’s jump in!


Drawing a Basic Fashion Figure
Remember in the last lesson we talked about how people struggle with fashion drawing, and the importance of sticking to one method until you feel comfortable and confident to make changes and come up with your own style?
Well, today we’re going to use the method I teach to draw fashion figures, we’re going to draw them with the help of the Fashion Figure Cheat-Sheet, and once you get familiar with the method you’ll be faster and more accurate at drawing your fashion figures. And, what is best, the more you practice the sooner you’ll get rid of the cheat-sheet, and you’ll draw your fashion figures at ease 😀
Okay, this basic figure will have a simple standing pose. It is very popular among fashion designers and illustrators because it is simple, easy to draw, and allows people to see the full outfit on the front view. This kind of pose is perfect for a simple fashion illustration.
The fashion figure’s size and proportions vary from designer to designer, and from illustrator to illustrator. Everyone adds, reduces, or changes something or some things to make the figures look different and recognizable as theirs. And once you become familiar with the basic proportions, you can experiment and add more of you to your drawings.
The Human Body in Fashion Drawing
The fashion figures I present here are based on a 9 head height. That means that the figure is divided into 9 equal parts, and each part is the same size as the head of the figure. So, 1 head becomes the main measurement unit along this method.
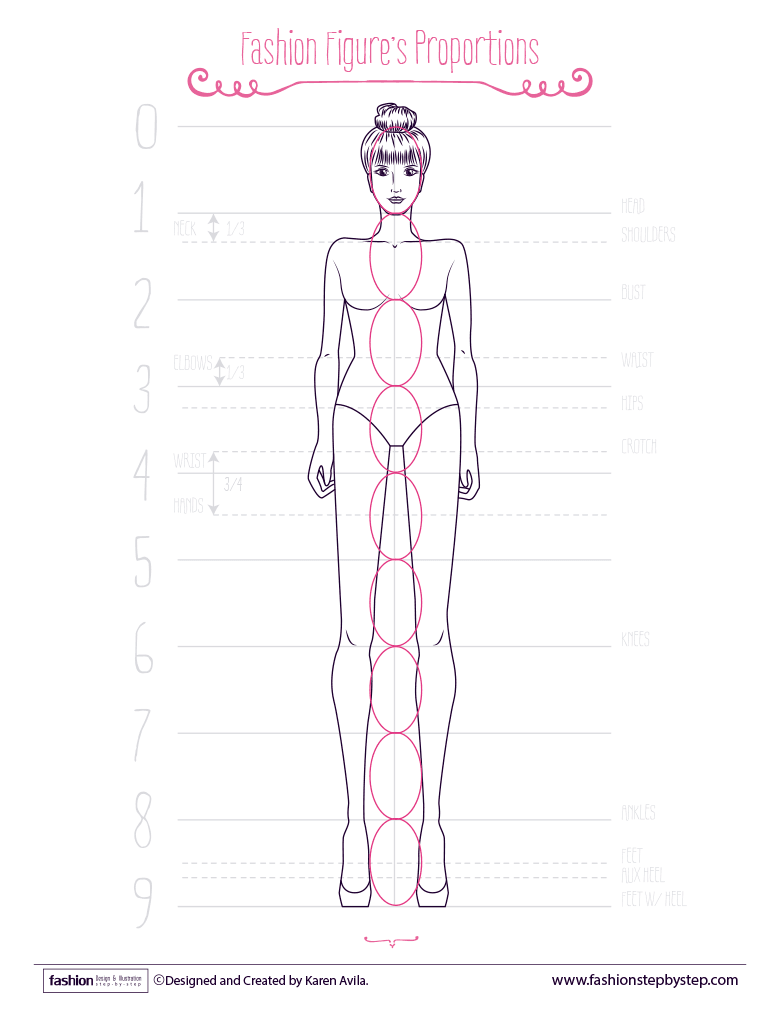
Why 9 Heads?
Eight heads are the approximate real proportion to the human body. But, in fashion drawing and illustration the legs of the figure are usually elongated to make the body look more stylish.
Should I Stick to these Proportions?
It is completely up to you. You can finish one figure with these proportions in order to get familiar with the method, and then create your drawings with the proportions you like the most.
Nothing is set in stone, this time is for you to explore and experiment, to improve your skills, and why not, to start realizing which features, sizes, and proportions can be part of your signature style and which don’t.
So, How do I Draw the Basic Figure?
To draw a basic figure, and any figure in any pose, we’ll do it in 3 phases:
Phase 1. Determine the basic lines, pose, and proportions of the figure.
Phase 2. Determine the basic shapes for all extremities and torso.
Phase 3. Come up with the final figure, round the body, and give the figure its natural and organic look. And also add the face and hair.
Use the Balance Line as the center of the Body (this line is supposed to go straight down from the base of the neck to the floor). Experiment with different kinds of arms, hands, legs, feet, faces, and torsos. Mix and match until you find the PERFECT figure for you.
Now practice and draw a lot of figures.

Drawing a Fashion Figure in Action
For this kind of fashion figure you will follow the same phases as with a basic figure:
Phase 1. Basic Lines.
Phase 2. Basic Shapes.
Phase 3. Final Figure.
The balance line will remain in the same position (from the base of the neck to the floor), and as its name says, it will help you to balance the figure.
So, what’s different?
Instead of using the balance line as the center of the body you will create another line, the Center Line. It could have the shape of an S or a C. It comes from the base of the neck (shoulder’s line) to the crotch, and it could be extended ’til the top of the head, so the head has an inclined position.
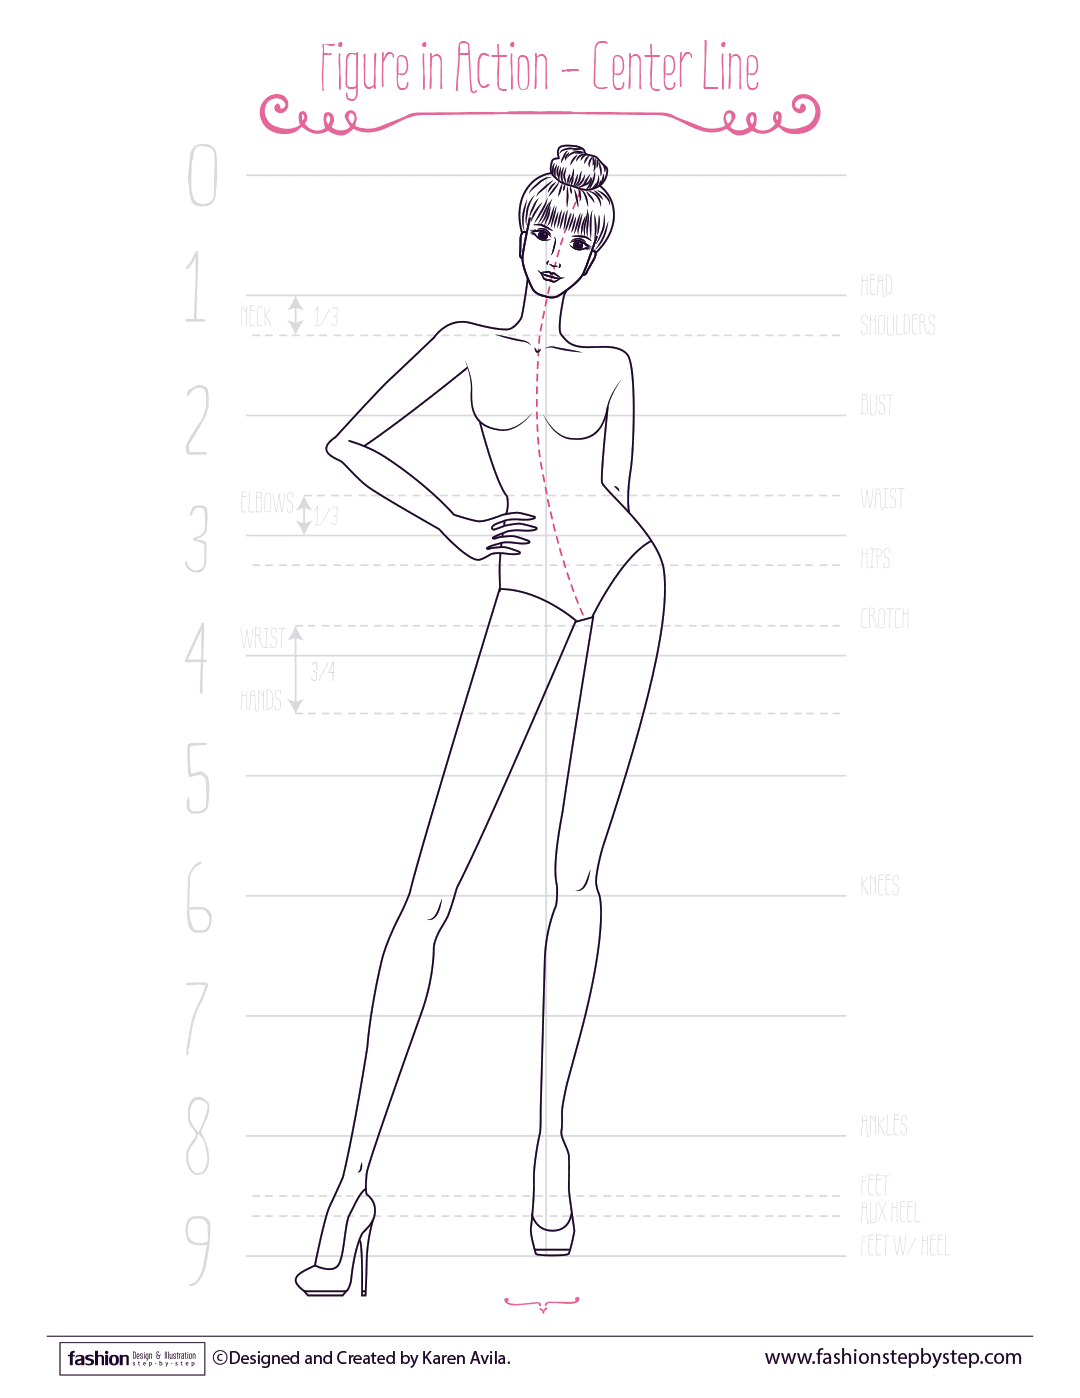

Another difference is in the legs; you can give them varied directions and positions. Make sure you have a Supporting Leg, this comes from the higher hip to the ankles towards the balance line. And it helps you to balance the figure, so it doesn’t look like it will fall.
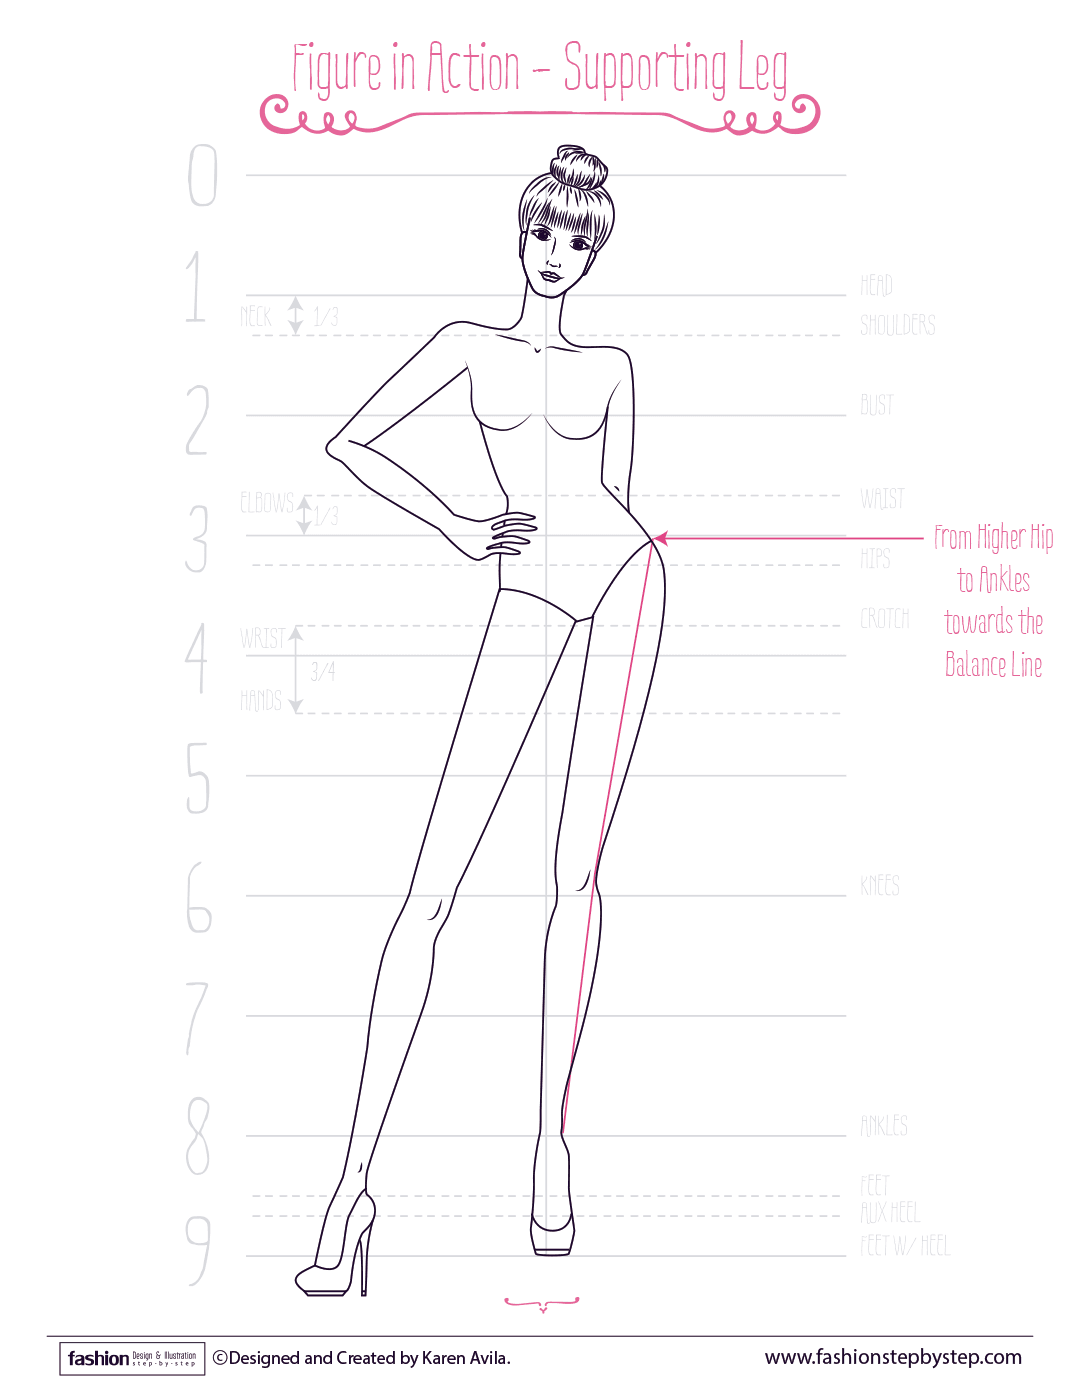

The other leg is the ‘Action Leg’, this comes from the lower hip and it can have any direction and position.
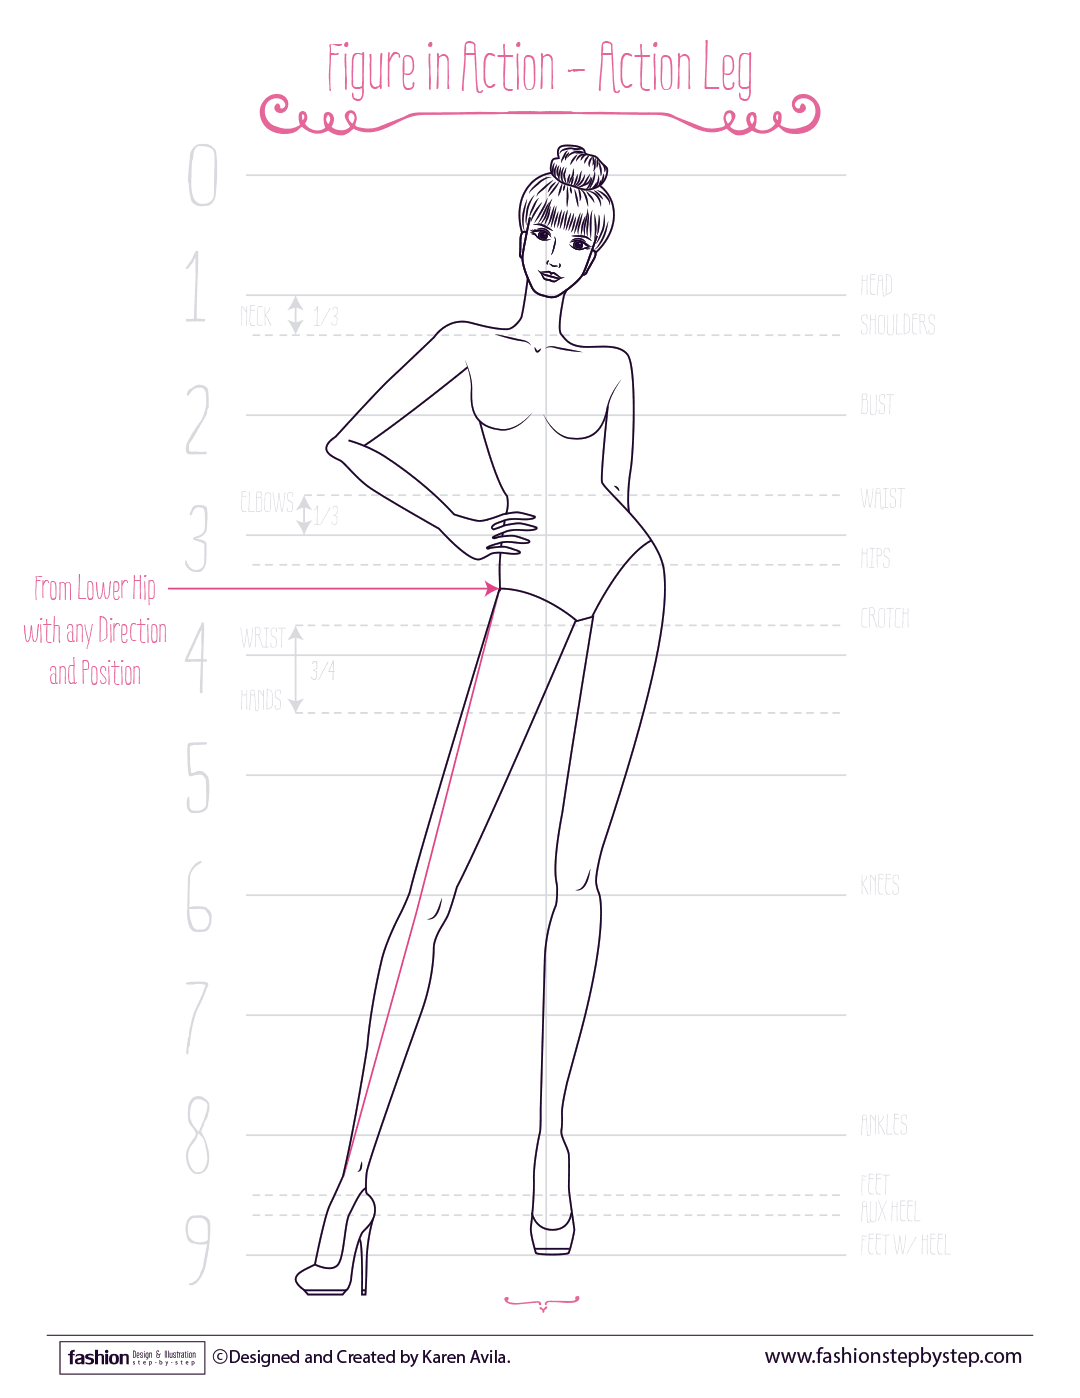

The arms can remain straight, or have any direction and position. You just need to keep their proportions.
With these basic changes, you can create a ton of different figures, are you ready?

Today’s assignment is
- Read today’s lesson, watch the videos, and use your workbook.
- Create as many fashion figures basic and in action as you want. The more the better.
- Experiment changing their proportions, and give to your fashion figures a face with a hairstyle.
- Remember you will illustrate your source of inspiration, so determine the pose that it has. Is it basic? Is it dynamic?
- Practice drawing the pose that your source of inspiration has. If you don’t accomplish it at the first attempt, don’t worry, remember that with every single attempt you improve, and you’ll get there – I know it!
- Once you practice, create another (or several) fashion figure with the pose of your source of inspiration, this will be for your final simple fashion illustration.So, make sure you use the proper paper according to the art media that you’ll use. I’ll color with markers, so I’ll use bristol board.Also, use a pencil that is light, the hard pencils will do their job, I love using 2H and 4H.
- And share with me your drawings via email, or if you want to meet your classmates share your answers via Instagram with the hashtag #FashionIllustrationCourse.
Now go and improve your drawing figures skills, because next lesson is all about drawing flat garments, and it comes with different videos!
Love!
![]()

